 ownloads Documentation Centre!
Create Download from Front End - Permissions and Access
create a Viewing Access
Introduction
Creating a new or editting an existing Download from the front end is a standard jDownloads feature. One of the menu item types available with jDownload is 'Create Download' and this provides the basic mechanism as described in Create Download Menu Item.(opens in a new window/tab). However it is obvious that there is a need to control who is allowed to do this.
Often the first thought is to use the existing Editor user group but experience shows that it is wise to separate the creation and editting of aticles separate from creation and editting of Downloads. Users may of course be members of more than one user group
Often the first thought is to use the existing Editor user group but experience shows that it is wise to separate the creation and editting of aticles separate from creation and editting of Downloads. Users may of course be members of more than one user group
Create A User Group
General Issues
The first step is to use the Joomla User Manager to create a User Group with the approriate permissions. In this example we will use a group name 'uploaderUG' for users who will be able to create, edit and publish Downloads from the front end.
Whilst the groups could have in principle any parent it is usually best to create the required user group with Registered as its parent. This avoids unintended consequences such as an 'uploader' user being able to edit articles and similar if you use Editor or any higher level group.
Whilst the groups could have in principle any parent it is usually best to create the required user group with Registered as its parent. This avoids unintended consequences such as an 'uploader' user being able to edit articles and similar if you use Editor or any higher level group.
To create a group just go to  and select
  . Then click on
  The usergroup creation form will appear.
Enter the Group Title, uploaderUG in this example. And use the pull down to select Registered as the Group Parent.
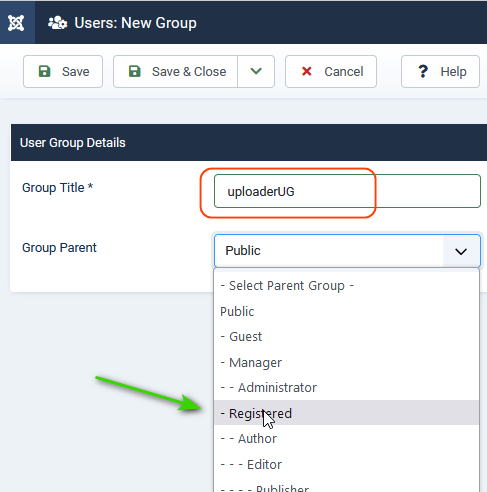
Enter the Group Title, uploaderUG in this example. And use the pull down to select Registered as the Group Parent.
Finally use
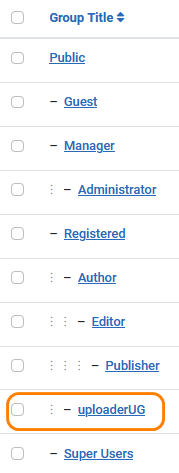
This will show the updated list of User Groups as illustrated opposite.
Set Permissions
Whatever group name that you decide to use, the important aspect is to set the permissions on the top level Categories. It is sufficient to just set the permissions in the top level categories as the permissions will automatically cascade from parent to child down the the subcategories and on to the Downloads.
Also bear in mind that if you select a user group parent other than Registered then you may inadvertently give the user edit or similar rights to articles and other items on your website.
This is also explained in more detail in the article Controlled Access to Categories and Downloads.(opens in new window/tab)
View Access Levels
The next step is to create a Viewing Access Level corresponding to the user group. The reasons for this is so that when we create the menu items they will only appear for the appropriate user group menu item.
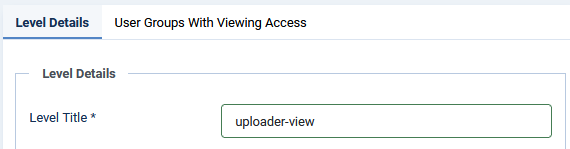
From the Joomla mainpanel click on then on  ,next on This will open the creation form. So first enter the name 'uploader-view' as below
From the Joomla mainpanel click on
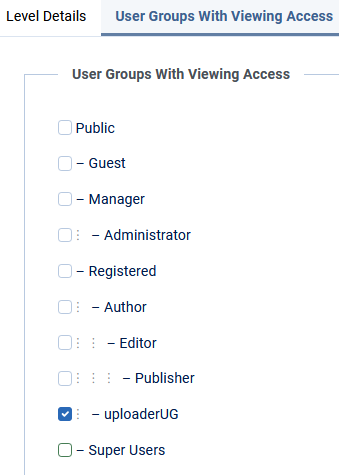
Next select 'User Groups with Viewing Access' and tick 'uploaderUG' and 'Super Users' as shown opposite.
Finally click on
Menu Items
Whilst doing Joomla! related actions it is probably convenient to create the menu item at this stage.
Select
For more details see Create Download Menu item (opens in a new window/tab).
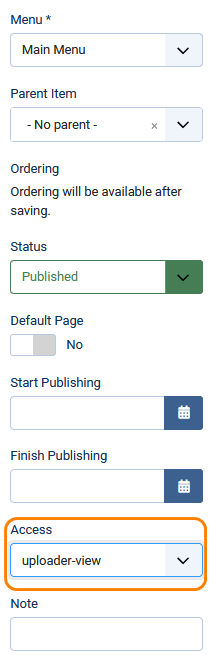
As shown opposite the key point is that the Access is set up to only show the menu item to members of a specific group.
In the Menu Options tab you can limit the created Downoads to a specific Category and its sub-categories.
Setting jDownloads items
Check for Create Permission
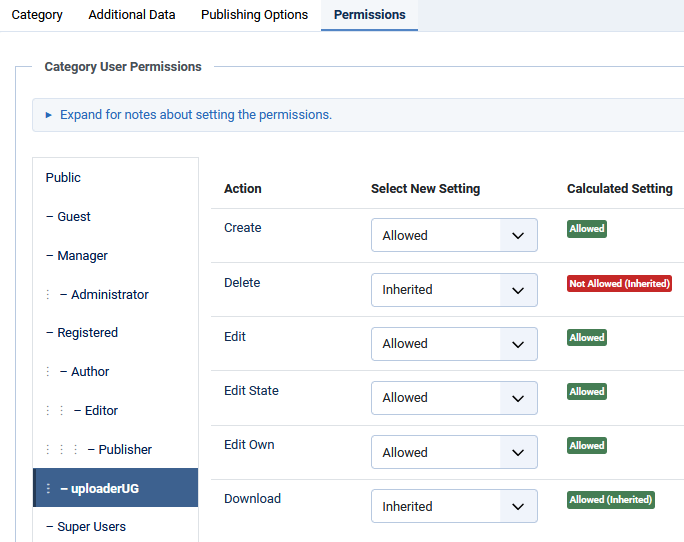
Having set up the Joomla! Side of things now look at the jDownload side. Actually the next thing to do is to check that the Joomla! permissions allows Creation of Downloads. The most flexible way of doing this is to use the Permission settings of the top level categories. For each of these categories click on 'uploaderUG' then this will produce a view like the one opposite, which is a typical default setting.
The important point is that Create is allowed.
Set Ranking value
Remember to set the Ranking in User Groups Setting to an appropriate value, say 131 for the uploaderUG group so that it is higher than the rank of any other user group. If a user belongs to more than one group jDownloads uses the group that which has the highest ranking to select the User Group Settings that should be used. jDownloads does not use the Rank value to select which set of permissions apply, it is used to select which set of User Group Settings should be used. This is significant as it is the User Group Settings that control the questions asked in the upload form. This is discussed below.
We are now done with this one time setup of the access but if you should find that some categories will not allow the user to upload into them then you will need to check and ensure the groups have create permission at each level in the chain. If you originally set up the Public Access or the Registered Access to 'Download Allowed' then the defaults will have set the higher groups access in a suitable manner.
User Group settings
The next stage is configuring the jDownloads User Group Settings. This maybe accessed from the jDownloads Control Panel. Much of what is needed here is covered in detail in Introduction to User Group Settings (opens in new window/tab). So rather than go through those details here we will look at some specific points. Go to  then click on 'uploaderUG'. Then select the Group Creation/Editing Settings as illustrated opposite. The 'May select a different Category' checkbox would normally be ticked.
The 'Publish new Downloads' checkbox would also be ticked. Note also that the Allowed File Types text box may be edited so as to include more file types such as pdf, doc, docx, jpg, png and so on.
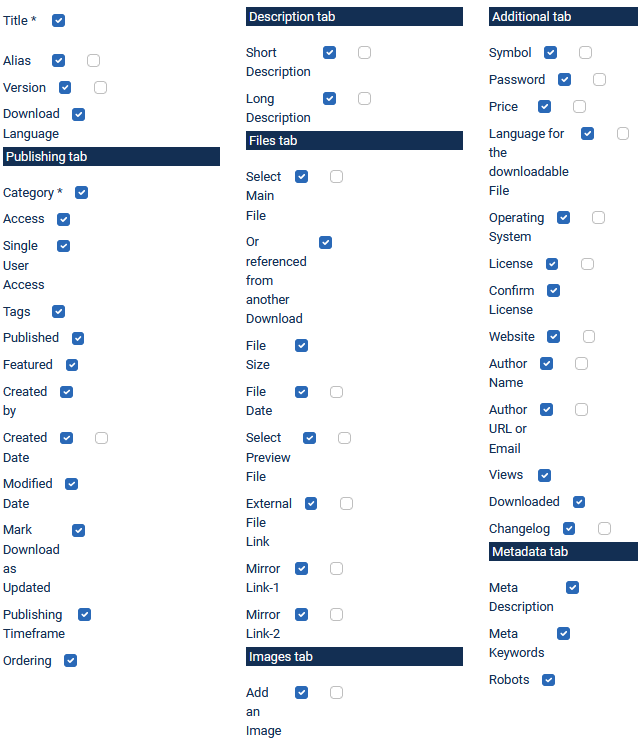
The three coumns below, which appear as a single column further down in the Group Creation/Editing Settings, allow control over what questions are presented to 'uploaderUG' members.
The title and category have an * to denote they are mandatory. The first column of checkboxes is checked if the question is to be asked. The second checkbox alongside a question, if present, makes the question mandatory if checked.
ColinM November 2019, modified June 2023