Fields in jDownloads
Introduction
jDownloads 4, and 3.9, support Joomla! Fields and Field Groups. They may of course be multilingual but the default is for a single language.
Historically version jD3.2 and earlier provided a limited number of what were called 'jDownloads Custom Fields'.
When upgrading from the jD3.2 series to the 3.9 series the old style jD Custom fields are automatically converted to Joomla Fields.
The Fields and Field Groups discussed here are those that have been created in jDownloads.
Field titles and contents are displayed in the frontend using placeholder variables {jd_field_title id} and {jd_field id} where id is the relevant id of the required Field created in jDownloads.
Fields do not have to be in a Field Group, in effect when not in an explicit group they then belong in the 'ungrouped' group!
In this example we will first create a Field Group as placing Fields in a group simplifies using them when subsequently creating or editing Downloads.
One instance is that when creating a Field then the permissions are taken from those set in its Field Group. Another is that when editting in the frontend all the Fields in a Field Group are shown in a single tab.
Creating Field Groups
Select  in the jDownloads Control Panel and then click on
  . The Field Group Create panel will appear.
This has four tabs .
.
The relevant setting will, by default, be inherited by any Field that is a member of the Field Group.
This has four tabs
The relevant setting will, by default, be inherited by any Field that is a member of the Field Group.
General tab
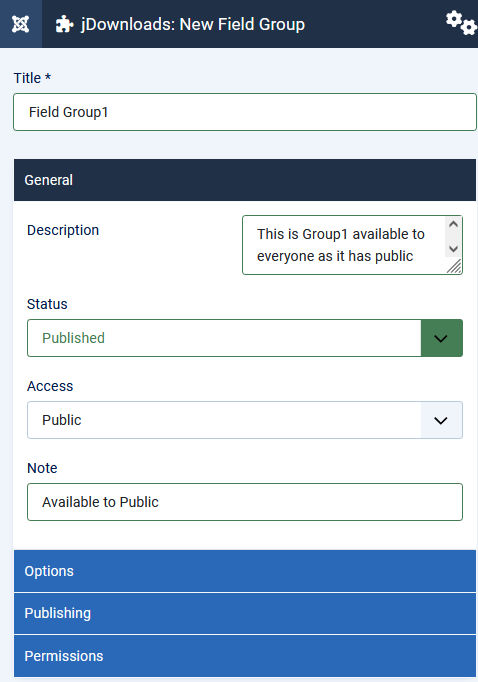
In the General tab ensure the Field Group is Published.
As the site is not multilingual there is no language option.
Also set the Access as required, which would usually be Public so everyone will see the group.
Give the group a Description as that will guide users in the Frontend who are able to edit fields.
Also add a comment in the Note as that will appear in the Backend.
Publishing tab
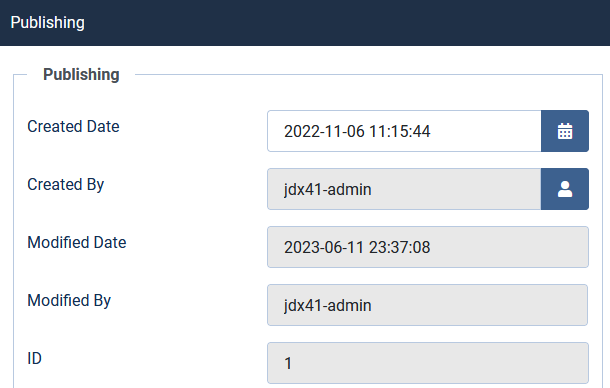
The settings in the Publishing tab are self explanatory.
The only setting that can be changed is the 'Created Date'.
The other options are filled automatically.
Options tab
The Options tab has just one setting 'Display When Read-Only'.
This is best left at the default value 'Yes'.

Permissions tab
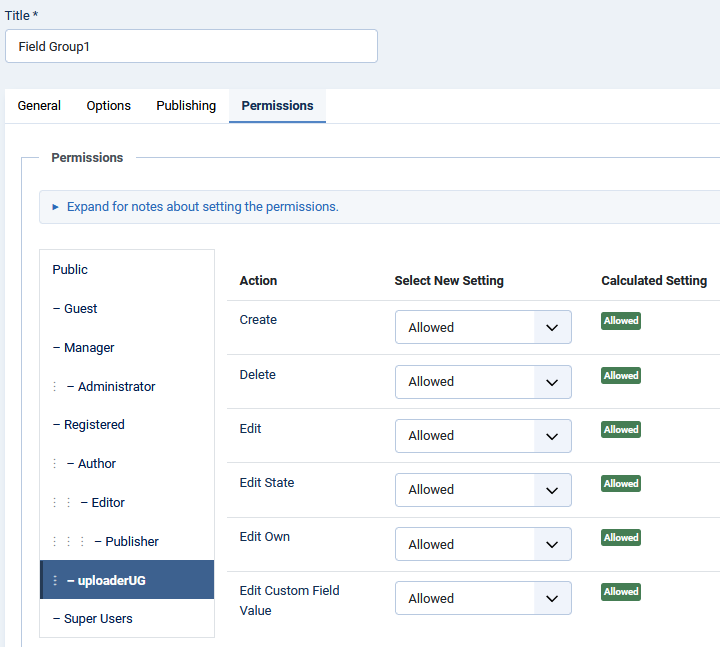
On the Permissions Tab set up the relevant permissions for those User Groups that are to be allowed to create/edit in the Front End.
The default permission for front end users is
One of the significant features of Field Groups is that these permissions will then be inherited by all the Fields that belong to the Field Group.
For Fields that do not belong to a Field Group then you have to set Permissions for each Field individually!
Creating Fields
The next step is to create the relevant Fields. In this example there are three Fields, a simple 'Text' field, a 'Colour' field and a 'Radio' field.
So select and then click on
  which will open the Fields create/edit form. Here we initially show details of creating a Text type as that covers most required fields. Field types like Text and Colour only have one Text and one Value to enter. Later we also show creating a Radio field as it has multiple text/value possibilities.
So select
General tab
On the General tab, as shown opposite, give a suitable title. In this article we have used 'Text Field 1'. Note that this will also automatically fill the 'Label' option.
When the Field is Saved then the Name option, which is like the 'alias', will be generated from the title.
The Type pulldown sets the type of the Field from the pulldown list of those available. Once saved it cannot be changed.
It is strongly suggested that you leave the Default Value option empty.
When there is no Default Value then the Field will not be shown until it is editted and given a value in the relevant Download.
If you do specify a Default Value then this value will appear in all Downloads that have not had an explicit value entered.
Ensure you set the Field Group by using the pull down.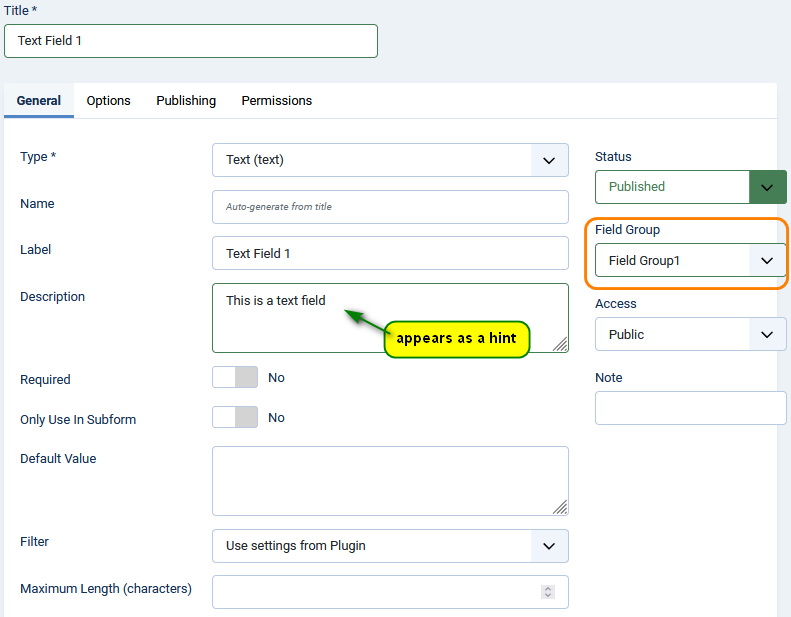

Options Tab
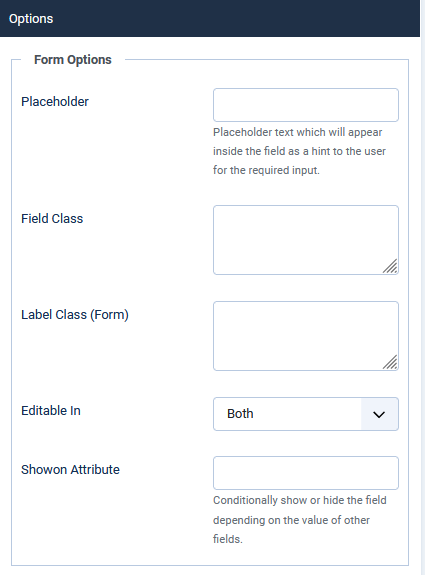
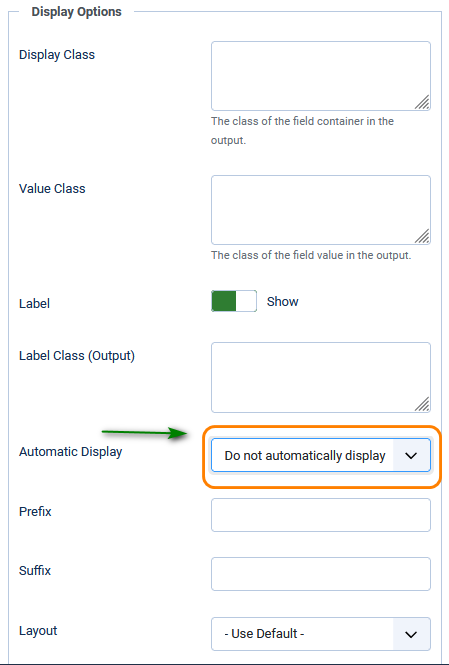
The Options tab basically deals with how the Field text and value are to be shown in the Front End. It is in two sections: Form Options and Display Options.
The items in the 'Form Options' section allow styling how the text and value will appear in the Edit Form.
The settings in the 'Render Options' section mainly style the look of the Text and Value as they are to appear in the frontend view.
However the Automatic Display setting controls where the text and value will appear in the Front End. This is discussed in more detail later.
As a starting point it is strongly suggested the 'Automatic Display' option is set to 'Do not Automatically Display' as indicated..
Publishing Tab
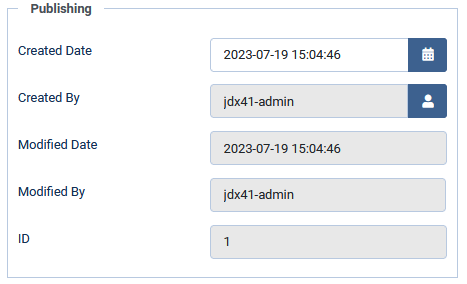
The Publishing Tab allows setting or changing the created Date.
The Created By, Modified Date and Modified By entries are auto filled.
 '
'Permissions Tab
The default setting for permissions is that they are inherited from the Permissions set in the Field Group. But they do need to be set separately if the Field is not in a Field Group.
Radio Field Example
Setting up the Options, Publishing and Permissions tabs is similar for all Field types.
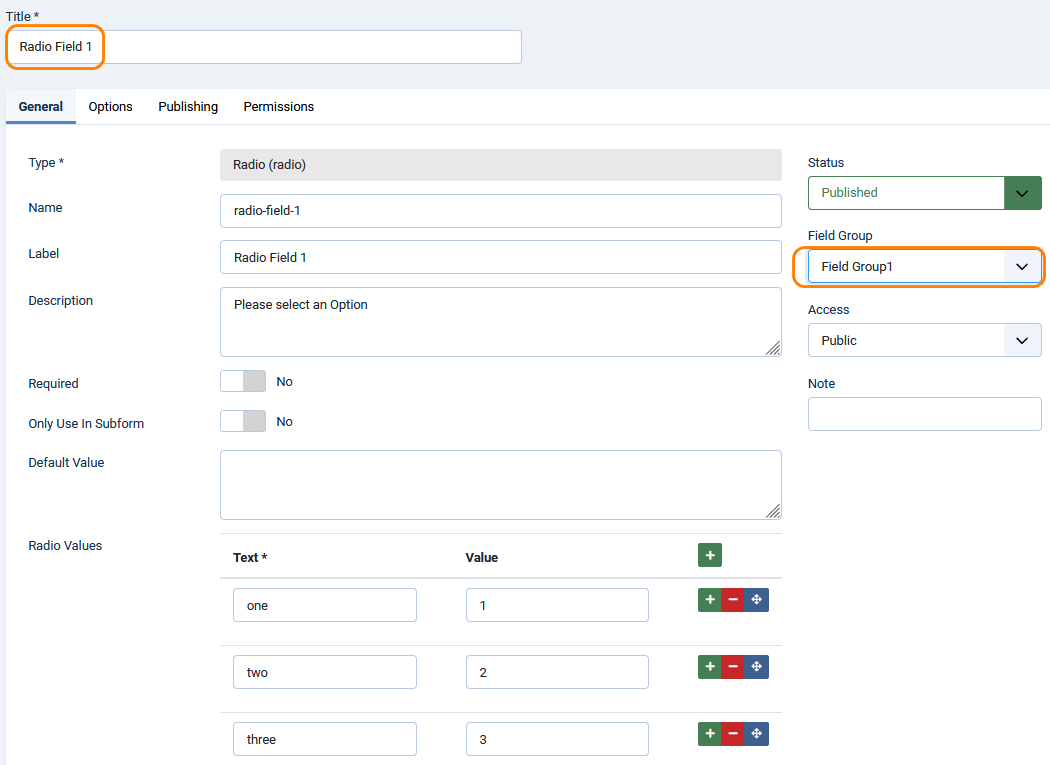
Give the Field a suitable title. When you  , the Name and Label options will be filled automatically from the title.
To add the Radio Text and Values click on the button for each radio button you wish to have. Enter in the Text column the 'question' that the user will see, and in the Value column specify the vaue, which is actually text, that will be returned to the code when the button is selected in the front end.
Ensure you select the relevant Field Group from the pulldown
Field types like Text and Colour only have one Text and one Value to enter.
To add the Radio Text and Values click on the
Ensure you select the relevant Field Group from the pulldown
Field types like Text and Colour only have one Text and one Value to enter.

Editing in Frontend
Diferent views occur for non-multilingual sites, where all content has ALL for the Download Language, and Multilingual sites which use language specifiers such as {de-DE}
Multilingual sites
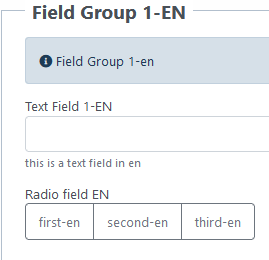
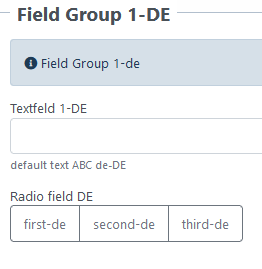
Example views of the tabs that are present when editing/creating a Download in the frontend for a multilingual site are shown below.
The first one is where the Download was set to English.

The second one is where the Download was set to the German language.

Each tab in the edit form for the Field Groups is shown opposite.
The 'English' and 'German' are logically identical to the others. This was not done by Joomla! or jDownloads but by the author for consistency.
One is free to set completely different 'questions' and response values.
Whilst the response values would be different in different Downloads, it is clearly good practice to make the 'question' text logically identical across languages.


Viewing Fields in Frontend
There are three situations for showing jDownloads fields in the front end:
(i) in a Download or Download Details layout information block;
(ii) in a Description;
(iiI) in an article.
The Downloads use the place holders {jd_field_title id} and {jd_field id} where id is the relevant id of the required field.
(i) in a Download or Download Details layout information block;
(ii) in a Description;
(iiI) in an article.
The Downloads use the place holders {jd_field_title id} and {jd_field id} where id is the relevant id of the required field.
In Layouts
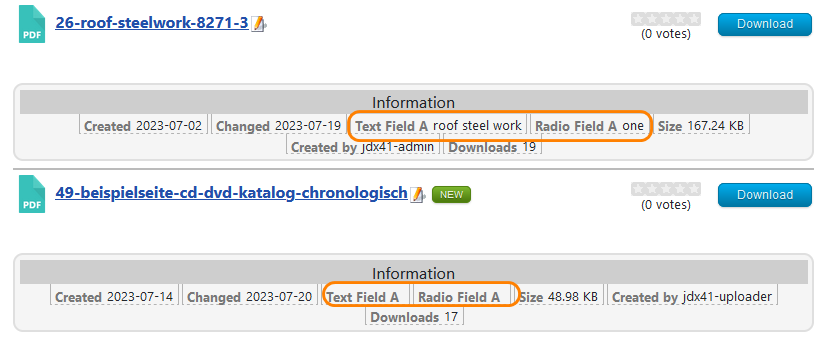
In this example the Fields are shown as part of the Information section of the Compact layout.
The image opposite is the frontend view.
In the first Download the Field Titles and the Field Values are shown.
In the second image only the Field Titles are shown. This is because no value has been set.
One may of course set a Default Value so that a value is always shown.
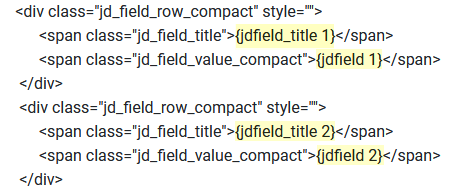
The image opposite shows the code included in the information block section of the layout. It follows the regular style of the layouts.
The 'macros'{jdfield_title id} and {jdfield id} are highlighted.
.


Setting up Fields and Field Groups in a multilingual site is just the same except to work properly you need to use the jDownloads multilingual placeholders like
The image opposite shows part of a Compact Layout that has been modified to support two Fields in mutiple languages.
With this method there are no 'blank spaces' shown in the front-end for the other languages.
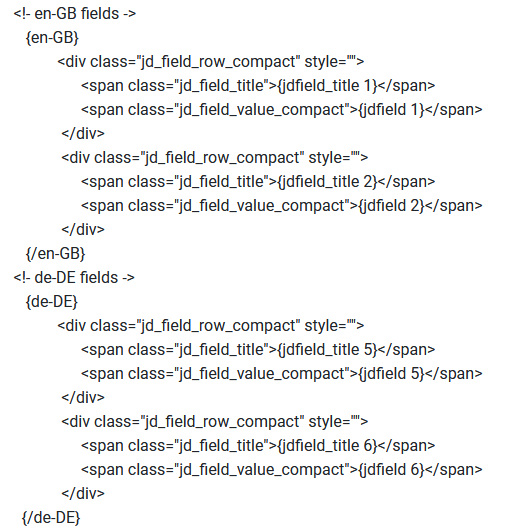
{en-Gb}, {de-DE} and so on.The image opposite shows part of a Compact Layout that has been modified to support two Fields in mutiple languages.
With this method there are no 'blank spaces' shown in the front-end for the other languages.

The image opposite shows an fr-FR information block in a multilingual site


In a Download Description
Opposite is an example of the view in the Frontend of a Download with Fields in the Description.
In this example the same fields are shown in the 'Information' section.
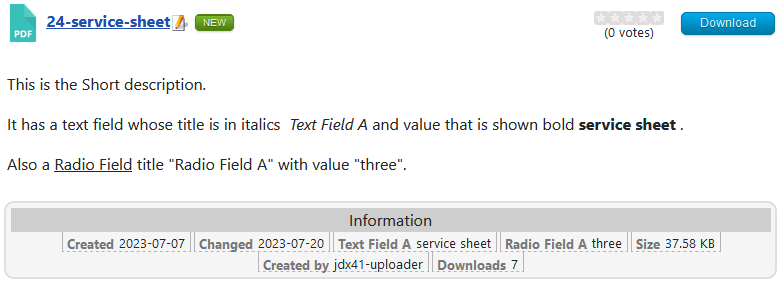
The actual text in the Description is shown opposite.

In an Article
The Joomla! Content-Fields plugin has two placeholders for use in articles
(i) shows an individual field and (ii) to show the whole field group, that is all the fields in that group.
(i) shows an individual field and (ii) to show the whole field group, that is all the fields in that group.
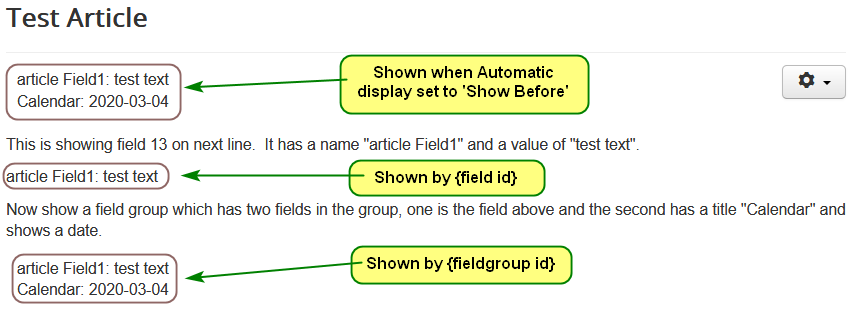
For example shows the field title and the field value with id 13;
lists all the fields in the field group with id 2 .
In the example shown opposite each field had the 'Automatic Display' option set to 'Do not automatically display'.
lists all the fields in the field group with id 2 .
In the example shown opposite each field had the 'Automatic Display' option set to 'Do not automatically display'.

The effect of changing the 'Automatic Display' option to one of the other settings, such as 'Before Display' is shown opposite.
The 'Automatic Display' setting 'Show Before' will also show the fields in Downloads but this is rarely useful.
Colin M March 2022, April 2023,July 2023
 ownloads Documentation Centre!