
Page 1 of 4
Introduction
XAMPP running on a Windows 10/11 PC provides an excellent and safe development environment. There are several stages involved. During the process it is obviously necessary to download the appropriate version of XAMPP and the latest version of Joomla!
NOTE XAMPP does not appear to have been updated recently, specifically it does not seem to support PHP 8.4, which is the preferred level for Joomla 6.
So XAMPP is only useful with Joomla! 4 and Joomla! 5.
This is a long article as there are many stages so allow plenty of time!!
Often one wishes to test an existing site, perhaps to test an upgrade before committing on the 'live' web site. So in Appendix 3 there are notes on using an Akeeba backup This assumes you have set up and configured XAMPP as noted in the main part of this article.
NOTE XAMPP does not appear to have been updated recently, specifically it does not seem to support PHP 8.4, which is the preferred level for Joomla 6.
So XAMPP is only useful with Joomla! 4 and Joomla! 5.
This is a long article as there are many stages so allow plenty of time!!
Often one wishes to test an existing site, perhaps to test an upgrade before committing on the 'live' web site. So in Appendix 3 there are notes on using an Akeeba backup This assumes you have set up and configured XAMPP as noted in the main part of this article.
Joomla 4 & 5 Requirements
As at April 2026 the recommended version of PHP for Joomla 5 is from PHP8.1.0 to PHP 8.3. So PHP 8.2 is good for for both Joomla! 4.4 and Joomla! 5.
For the database Joomla recomends
for Joomla 4: MySQL and ProgreSQL;
for Joomla 5: MySQL, MariaDB and ProgressSQL.
The versions of XAMPP that are available for Windows includes PHP 8.1.2 together with
Maria 10.4.2
Note that the Windows versions comes with MariaDB.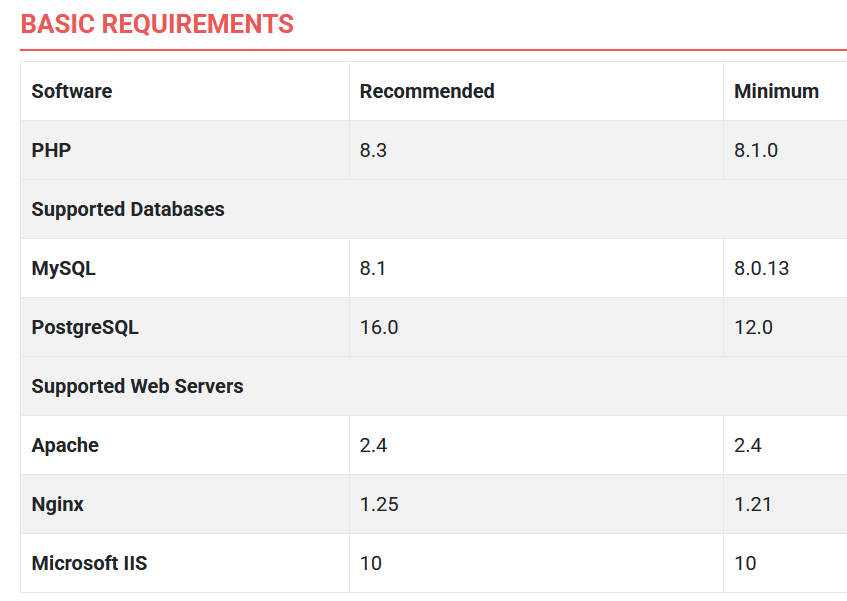
For the database Joomla recomends
for Joomla 4: MySQL and ProgreSQL;
for Joomla 5: MySQL, MariaDB and ProgressSQL.
The versions of XAMPP that are available for Windows includes PHP 8.1.2 together with
Maria 10.4.2
Note that the Windows versions comes with MariaDB.
MariaDB is a fork of MySQL by the original 'open source' developers. So actually it is compatible. For reference there have been over a quarter of a million XAMPP 8.2.12 downloads! So here we use XAMPP 8.2.12.
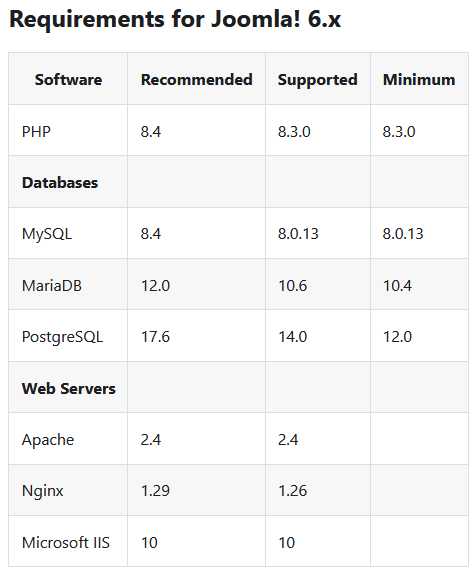
Joomla 6 Requirements
The Joomla 6 requirements are shown opposite.
In the web servers section XAMPP uses Apache.
Other Requirements
In my experience it is also necessary to download and use the free Notepad++ text editor rather than attempt to struggle with the default Win10 Notepad which is, in a practical sense, useless for editing php and similar files. You can get Notepad++ from https://notepad-plus-plus.org/ (opens in a new window/tab)
It would probably repay the effort if you practice a little to become familiar with Notepad++
Another useful free utility program is 7zip to unpack zip files, not essential but I would highly recommend it.
This is available at https://www.7-zip.org/ (opens in a new window/tab)
Also with XAMPP on a local PC then the Joomla! features 'Install from the Web' and 'Auto updating of Joomula!' work OK but personally I tend to download the actual 'update', probably because I have several sites to update!!
In this article XAMPP is installed on drive C. If you have another disk drive, say D, then it may be set up on that drive instead.
Most of the effort is in configuring of XAMPP for Joomla!. Once that is setup it is then it is simple to create multiple test sites.
It would probably repay the effort if you practice a little to become familiar with Notepad++
Another useful free utility program is 7zip to unpack zip files, not essential but I would highly recommend it.
This is available at https://www.7-zip.org/ (opens in a new window/tab)
Also with XAMPP on a local PC then the Joomla! features 'Install from the Web' and 'Auto updating of Joomula!' work OK but personally I tend to download the actual 'update', probably because I have several sites to update!!
In this article XAMPP is installed on drive C. If you have another disk drive, say D, then it may be set up on that drive instead.
Most of the effort is in configuring of XAMPP for Joomla!. Once that is setup it is then it is simple to create multiple test sites.
Install XAMPP for Windows
XAMPP is available at https://www.apachefriends.org/download.html (opens in a new window/tab).
For Joomla 4.4 (and later versions) and Joomla 5 use version 8.2.12. To initiate click on as indicated opposite. You may see a message as below so click where indicated
 As the XAMPP installer is typically 150 Mbytes downloading may take a while.

For Joomla 4.4 (and later versions) and Joomla 5 use version 8.2.12. To initiate click on
as indicated opposite. You may see a message as below so click where indicatedAs the XAMPP installer is typically 150 Mbytes downloading may take a while. I use the Firefox browser which shows a progress indicator such as  at top right. When downloading is finished it becomes
  .
.
at top right. When downloading is finished it becomes . Assuming you have not changed the Windows location where downloads are saved, the Windows downloads area is denoted by the Button  located at top right of the screen. Clicking on the button shows a view such as shown opposite.

located at top right of the screen. Clicking on the button shows a view such as shown opposite. After clicking on  you are taken to the location of the Installer. I usually save this file in an appropriate location and then click on it to initiate the installation.

you are taken to the location of the Installer. I usually save this file in an appropriate location and then click on it to initiate the installation.You will be asked if you want to run this file and then be asked if you wish to allow changes to be made. Answer Yes both times.

Ensure you set Save File.

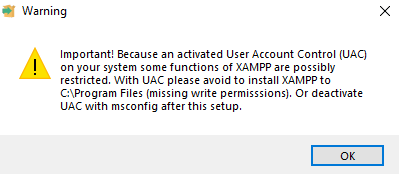
If you have User Account Control active then you will see the warning opposite which basically says do not install XAMPP in C:\Program Files. As we will be installing in C:xamp this is not a problem.
You may be asked if you want to run this file and then be asked if you wish to allow changes to be made.
Select Yes in both cases.

XAMPP will let you know when it is ready to install, so click on Next as indicated.
A view of the installation progress is usually shown.


A view of the installation progress is usually shown.
A warning might come up about having Anti-Virus software running.
If you do decide to turn off your anti virus it might also be useful to temporarily disconnect from the web. Actually I always leave the anti virus running and have not had a problem but .....!!!!
If you do decide to turn off your anti virus it might also be useful to temporarily disconnect from the web. Actually I always leave the anti virus running and have not had a problem but .....!!!!
Yet another warning that may occur is about User Account Control. As we are not installing in C:\Program Files (x86) but in directory
C:\xampp there is no conflict.
So click OK
The actual install now begins!
So click on the
 button.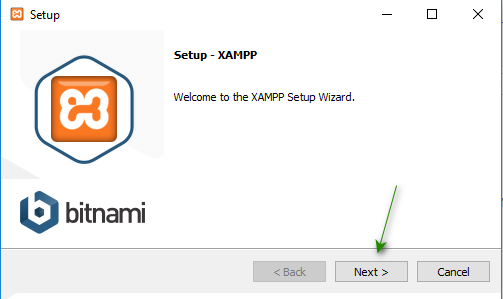
The first stage is the overall configuration of XAMPP.
It is advisable to select all of the options, which is the default, as they may be required at a later stage.
So again click on thebutton.
It is advisable to select all of the options, which is the default, as they may be required at a later stage.
So again click on the
button.Agree to the selected folder as shown, namely
C:\xampp
and click on.
Note if installing on a different drive then use the relevant drive letter.
Select the Language and again click on.

C:\xampp
and click on
.Note if installing on a different drive then use the relevant drive letter.
Select the Language and again click on
.An ‘advert’ for Bitnami may appear. This is sometimes useful to aid with the Joomla! Installation. Personally I prefer to do the installation directly.
So I would untick the ‘Learn more about ...’ and click.
If you do leave it ticked it takes you to your browser but does not interfere with the installation.
So I would untick the ‘Learn more about ...’ and click
.If you do leave it ticked it takes you to your browser but does not interfere with the installation.
The next page is basically just the progress window whilst XAMPP in being installed.
As this takes a few minutes it might be a good idea to take some refreshment!

Finally we get to completion.
Leave the "Do you want to start the Control Panel now?" ticked so that it will start the Control Panel initially.
Click on Finish

Start Control Panel
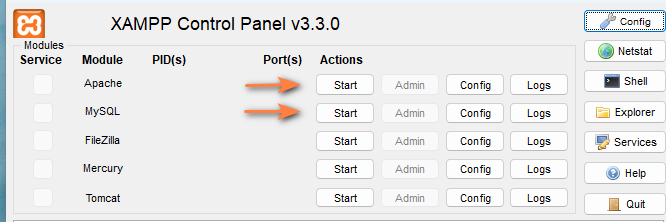
It is neccessary to click on the Apache and the MySQL Start buttons so that in the Module column they both have a green background.
This indicates they are active as shown in the image opposite.

Access XAMPP Control Panel
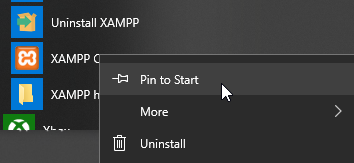
At this stage I close the XAMPP Control Panel and go to the Windows ‘panel’ which lists all the Apps and scroll down to the XAMMP entry. Click on XAMMP to show the sub menu.
Then Right Click on 'XAMMP Control Panel' which then shows another menu as illustrated below This will add a regular Win10 sub pane so you can get to the XAMPP control panel easily on future occasions. It will also allow you to run the control panel as an Administrator which more recent versions of XAMPP is beneficial.
See also the section later about creating a short cut on your desktop.

Then Right Click on 'XAMMP Control Panel' which then shows another menu as illustrated below This will add a regular Win10 sub pane so you can get to the XAMPP control panel easily on future occasions. It will also allow you to run the control panel as an Administrator which more recent versions of XAMPP is beneficial.
See also the section later about creating a short cut on your desktop.
Configure for Joomla!
After Clicking on the Config button at top right,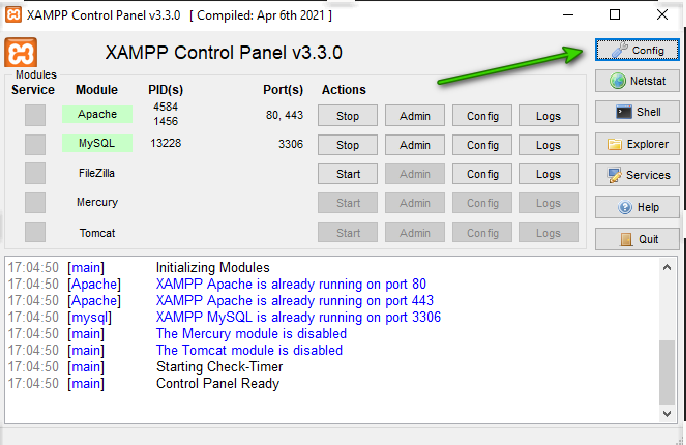 It is suggested that you select Autostart of the Apache and MySql modules as indicated opposite.
Experience shows that you will need a better editor than the default Microsoft Notepad text editor. A suitable editor is Notepad++ available from Download Notepad++ (opens in a new window/tab).
Details on installing Notepad++ are given in an Appendix.
Finally click on the button.
At this point you may get an error message saying 'Access Denied'. If that happens see the next section below.


It is suggested that you select Autostart of the Apache and MySql modules as indicated opposite.Experience shows that you will need a better editor than the default Microsoft Notepad text editor. A suitable editor is Notepad++ available from Download Notepad++ (opens in a new window/tab).
Details on installing Notepad++ are given in an Appendix.
Finally click on the
button.At this point you may get an error message saying 'Access Denied'. If that happens see the next section below.
Access Denied
If an Access Denied message, such as shown opposite, then there is a Windows Security issue.
This is readily resolved as shown below.

With File Explorer search directory C/xampp for xampp-control.ini. Then Right Click and select Properties.

When the Properties appear select the Security tab at the top.
In this example 'Everyone' is selected but it could be restricted to Admin users.
The Permissions show that at present the file only has Read access. So click on the Button.
Next Click on Full Control, which will set all the permissions as shown (NB appart from the Full Control tickbox the ohers are shown in grey).
Finally click OK.
For more information on Windows security there are many articles on the web such as
Acces is Denied in Win10 (opens in a new window/tab)

In this example 'Everyone' is selected but it could be restricted to Admin users.
The Permissions show that at present the file only has Read access. So click on the
Button.Next Click on Full Control, which will set all the permissions as shown (NB appart from the Full Control tickbox the ohers are shown in grey).
Finally click OK.
For more information on Windows security there are many articles on the web such as
Acces is Denied in Win10 (opens in a new window/tab)
Create Shortcut
It simplifies future use if you create a desktop icon to get to the XAMPP Control Panel.
Use file Explorer to navigate to C:/Windows/xampp and find program xampp-control.exe. Right click on the name and select 'Send To', then choose 'Desktop (create shortcut)' as illustrated opposite.

This creates a button like that shown opposite which we can use to start XAMPP and the relevant applications. It is also useful to right click on the desktop icon and use the 'Pin to Taskbar' facility.
When you click on the icon then the XAMPP Control Panel will appear.

The two essential applications are Apache and MySQL.
Notice that under the Actions column the words Start or Stop appear in the buttons.
If it shows Stop then that application is running, if it shows Start it is stopped. To activate the relevant applications then click on the appropriate Start button. After a short delay the Button text will change to Stop and a green background will appear in the Module column showing that the module is running as in the second picture opposite picture.

Setting php.ini
Main Settings
Often the existing php.ini file defaults need changing to suit Joomla! and to allow for say larger file size uploads. To do this is quite simple as we just edit the php.ini configuration file which is usually at C:\xampp\php\php.ini.
To edit open php.ini in Notepad++. With a fresh XAMPP install the settings output_buffering and display_errors need changing to meet Joomla! Recommendations. As you are running on your own PC then there are other settings that are useful to change, specifically max_execution_time and max_input_time. For jDownloads then I would recommend changing both post_max_size and upload_max_filesize to allow for larger file uploads.
To edit open php.ini in Notepad++. With a fresh XAMPP install the settings output_buffering and display_errors need changing to meet Joomla! Recommendations. As you are running on your own PC then there are other settings that are useful to change, specifically max_execution_time and max_input_time. For jDownloads then I would recommend changing both post_max_size and upload_max_filesize to allow for larger file uploads.
The php.ini file is quite large with lots of comments so use the Search facility in Notepad++ to find them one at a time. You need the line that is not a comment as illustrated opposite for output_buffering.
The suggested values are:
1. post_max_size = 120M
2. upload_max_filesize =100M
3. max_execution_time=200 (this parameter is not usually available to users on regular web servers)
4. max_input_time=200 (this parameter is not usually available to users on regular web servers)
5. output_buffering=Off (xampp default is usually output_buffering=4096)
6. display_errors=Off (xampp default is usually Off)
7. display_startup_errors=Off(xampp default is usually display_startup_errors=Off
The suggested values are:
1. post_max_size = 120M
2. upload_max_filesize =100M
3. max_execution_time=200 (this parameter is not usually available to users on regular web servers)
4. max_input_time=200 (this parameter is not usually available to users on regular web servers)
5. output_buffering=Off (xampp default is usually output_buffering=4096)
6. display_errors=Off (xampp default is usually Off)
7. display_startup_errors=Off(xampp default is usually display_startup_errors=Off
Note The upload_max_size is the maximum size for uploading a single file whilst post_max_size is maximum of a set of files uploaded together.
GD Library
GD is an open source code library for the dynamic creation of PNG, JPEG and GIF images for thumbnils and similar. It is included in XAMPP but we need to ensure it is activated.
The actual GD library is normally located in C:/xamp/php/ext
The actual GD library is normally located in C:/xamp/php/ext
For PHP8 the file is called php_gd.dll but for PHP7 and earlier it is php_gd2.dll.
To activate the library find in C:/xampp/php.ini the so called 'extensions section'. This section contain lines such as extension=bz2 extension=mbstring and so on.
Again using Notepad++ or similar edit php.ini
For PHP 8 remove the ; in the line extension=gd
For PHP 7 and earlier add the line extension=gd2
Save php.ini

Joomla! 4 & 5
Joomla! 4 and 5 also require that the extensions 'intl' and native 'zip' are available.
So in C:/xampp/php/php.ini search for extension=intl and remove the semi-colon ; at the start of the line (NB it may already been uncommented).
The php_intl.dll extension (Intl) is a wrapper for the ICU library, a set of C/C++ and Java libraries that provide Unicode and Globalisation support for software applications.
It enables PHP scripts to perform UCA-conformant collation and date/time/number/currency formatting.
Repeat for extension=zip and similarly remove the the semi-colon if it is there.
The function of the zip extension is obvious.


In directory xampp/php/ext check that extensions php_intl.dll and php_zip.dll are present as this is the location from which these dll's are loaded.
Restart Apache
After changing the values of the above parameters save php.ini, then restart Apache from the XAMPP control panel by clicking on the stop/start button on the Apache line to stop and then restart.
If the button shows Stop then it is running.
When running Apache has a green background .
If it shows Start it is inactive.
.
When running Apache has a green background .
If it shows Start it is inactive.
.
Accessing phpMyAdmin
Access will be needed to the phpMyAdmin utilty to create the database and create a user with a password.
There are several ways of doing this but perhaps the most convenient is to Click on the Admin button in the MySQL line on the XAMPP Control Panel.
Another simple way is to use a new tab in your Browser and execute localhost/phpmyadmin/
First we will check that we have direct access to phpMyAdmin so click on the Admin button on the MySQL line.
Another simple way is to use a new tab in your Browser and execute localhost/phpmyadmin/
First we will check that we have direct access to phpMyAdmin so click on the Admin button on the MySQL line.
This will take you directly to the base page so then Click on User Accounts. It will open a new tab, or window, in your browser.

At this stage we are just checking!! So do NOT do anything like clicking on priveleges!!
You can see that none of the accounts have a password set.
The next steps below will modify the root localhost to have a password.
You can see that none of the accounts have a password set.
The next steps below will modify the root localhost to have a password.
Now exit by closing the browser tab (or window). 
Set root password
By default the root user on localhost has no password. But Joomla! Sites require one!
That is we need to set a password for the User root on the localhost. The steps required to achieve this are given below.
Halt MySQL
We need to edit one of the XAMPP files (config.inc.php) so it is essential to ensure that MySQL is not running.
Do this by accessing the XAMPP Control Panel and ensuring that the state of MySQL is showing Start as illustrated opposite. If it is showing Stop then click on the button and after a short time it should change to Start.

Edit config.inc.php
The second step is to edit the file C:/xampp/phpmyadmin/config.inc.php using Notepad++
(Notepad does not support the 'newline' characters so it looks like one huge long string).
/* Authentication type and info */
$cfg['Servers'][$i]['auth_type'] = 'config';
$cfg['Servers'][$i]['user'] = 'root';
$cfg['Servers'][$i]['password'] = '';
$cfg['Servers'][$i]['extension'] = 'mysqli';
$cfg['Servers'][$i]['AllowNoPassword'] = true;
$cfg['Lang'] = '';
ONLY change the line $cfg['Servers'][$i]['auth_type'] = 'config'; to read $cfg['Servers'][$i]['auth_type'] = 'cookie';
Do not be tempted to change the other lines!! Save and exit Notepad++.
Next on the XAMPP Control Panel click on the button opposite MySQL so after a few moments it shows Stop
(Notepad does not support the 'newline' characters so it looks like one huge long string).
/* Authentication type and info */
$cfg['Servers'][$i]['auth_type'] = 'config';
$cfg['Servers'][$i]['user'] = 'root';
$cfg['Servers'][$i]['password'] = '';
$cfg['Servers'][$i]['extension'] = 'mysqli';
$cfg['Servers'][$i]['AllowNoPassword'] = true;
$cfg['Lang'] = '';
ONLY change the line $cfg['Servers'][$i]['auth_type'] = 'config'; to read $cfg['Servers'][$i]['auth_type'] = 'cookie';
Do not be tempted to change the other lines!! Save and exit Notepad++.
Next on the XAMPP Control Panel click on the button opposite MySQL so after a few moments it shows Stop
Change Password
Use localhost/phpmyadmin/ in your browser which will take us directly to the phpMyAdmin utility where you should see a log in screen such as shown opposite.
Presently the log in name is root and there is no password so leave that field blank.
Presently the log in name is root and there is no password so leave that field blank.
This will give the General Settings screen as shown opposite but note it now has a link to a Change password command.
This was not available previously.
This was not available previously.
Clicking on the Change Password option brings up the form shown opposite where the new password may be entered.

The change of password will be acknowledged with a message such as shown opposite.